I have one Chevy HHR and I had the problem with the dash being in night mode during bright sunlight(meaning the displays were dim and the dimmer would vary the brightness. ) Occasionally they would brighten up to max and the dimmer would no longer control the brightness (daytime mode.) This might never happen but when it did it could be 30 minutes after getting into sunlight. Turning the automatic lights off put it into daylight mode so I know the lamps/displays were all good. Shining a bright light on the sensor wouldn’t cause it to switch. They would stay dim.
The fix was the ambient light sensor at the top of the dash (often called the DRL sensor.) While it’s not a cakewalk to replace, it’s not terribly hard:
Tools to use:
– 7mm nut driver or socket unless a Philips is indicated
– 10mm deep socket and long extension
– Philips screwdriver. Shorty helps.
– Trim tools if you have them but not necessary. Just don’t pull until you know you didn’t miss a screw.
– New sensor: I ordered the 15837063 from the parts PDF and got a 13498957. It sits a bit more recessed in the dash but is otherwise a perfect fit. I don’t know if this is an updated version or they are just shipping one that will fit from some other model car.
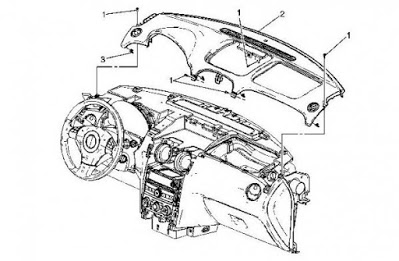
– I pasted an illustration of the screws holding the dash top down but it excluded the airbag bolts/nuts (see below.) Check for missed screws before you lift or pull!
1. Disconnect the battery. While you are not removing/disconnecting airbags you are messing around near them. You sure disable the airbags properly.
2. Removed the cubby below the HVAC controls and in front of the shifter. It just pulls out.
3. Remove the two screws holding the shifter surround to the dash under that cubby. Pull the surround back and up. This is to let the radio/HVAC trim to come out easier at the bottom and not break any tabs.
4. Grab the trim at the two dash vent openings at the top and pull. The trim will come out. Tilt it out and lift it from the bottom.
5. Remove the left and right pillar trim. There is a screw under the cover at the top on each side. You don’t need to completely remove them but pull them up so the dash top can lift up. If you have airbags, leave them connected. I don’t have them.
6. Remove the two screws on the left and right side holding the top dash trim to the dash frame. They are under the pillar trim you took off.
7. Remove the two screws holding the top storage compartment box in. Lift it out. (Philips)
8. Remove the two screws under that box holding the trim to the dash under that box.
9. Remove the single screw near the windshield holding the trim to the dash under that box.
10. Remove the two screws under the instrument panel trim at the top (above the cluster.) (Phillips.)
11. Release the two tabs on the lower glove box and let everything fall to the floor. Now let the door/shelf tilt down. Throw away the five year old registrations and insurance cards.
12. You don’t need to remove the air bag, rather removing the nuts (or screwing the down to the end of the bolts) lets the panel lift up.
13. Remove the two 10mm passenger airbag nuts that are on two long screws under the dash along the support beam. If you look or reach up there you can easily feel/see them.
14. On the driver’s side, lift up and pull out on the upper trim. There are clips along the windshield holding it down.
15. Now you can lift up on the center near the sensor and with the nuts on the airbag loosened, you can lift up the center of the dash top, reach in the while scraping the crap out of your hand and remove the sensor. On mine there was enough wire length to let me rotate it (it’s a bayonet lock) and then reach in and press the tab to release the connector. I connected the connector first then reaching in and rotated the sensor into place.
16. Assembly is the reverse. If the top seems to not want to drop flush again, check that the tabs along the windshield are in their slots. Also check the curved/hooked tabs on each side of the cluster. They tend to hang up. Just gently push them in.
17. This is a good time to add any felt pads to the trim to stop the squeaking.
– While I didn’t measure the good sensor before I installed it (dang), the bad one measured around 15k ohms covered and around 5k ohms with a bright light shining on it.
– If you have a GM Scan Tool Tech 2 scanner, the bad sensor would read around 4.5V in the dark (or covered) and a bright light would make it intermittently dip to 2V but never hold and often with no dip at all. The ambient sensor is in Body/Special Functions./Headlights.
– The new sensor reads 4.5V dark and 2.6V in sunlight on the Tech 2. You could also measure it at the BCM wires. One thing I’ve noticed on mine since I bought it is there is about a 90 second delay from going from a dark garage to sunlight before it switches to daylight mode (DRL and no dash dimmer control.) With the new sensor it now does that again.
If you have any clarifications, see errors or additional details, let me know and I will add/correct them.

Credits to @ terryk
Alright, welcome leave message at www.obd2tool.com if you have any advice and suggestion.