Select [Diagnose] in Main Menu and press [OK], the screen will display Monitor Status interface as following figure
1 OBDII/EOBD Diagnosing
This option presents a quick way to check for DTCs, isolate the cause of the illuminated Malfunction Indicator Lamp (MIL), check monitor status prior to emissions certification testing, verify repairs, and perform a number of other services that are emission-related. In Figure 5-1, press [OK] to enter system, the screen of CRP129 Premium will automatically jump to figure
Press [OK], a screen similar to Figure as follow will appear:

It mainly includes the following functions:
1. Read Codes
This option is used to identify which section of the emission control system has malfunctioned.
2. Erase Codes
After reading the retrieved codes from the vehicle and certain repairs have been carried out, you can use this function to erase the codes from the vehicle. Before performing this function, please be sure the vehicle’s ignition key is in the ON position with the engine off.
Notes:
a. Before performing this function, make sure to retrieve and record the trouble codes.
b. After clearing, you should retrieve trouble codes once more or turn ignition on and retrieve codes again. If there are still some trouble codes in the system,please troubleshoot the code using a factory diagnosis guide, then clear the code and recheck.
3. I/M Readiness
I/M refers to Inspection and Maintenance that is legislated by the Government to meet federal clean-air standards. I/M Readiness indicates whether or not the various emissions-related systems on the vehicle are operating properly and are ready for Inspection and Maintenance testing.
The purpose of the I/M Readiness Monitor Status is to indicate which of the vehicle’s Monitors have run and completed their diagnosis and testing(as described in Chapter 2.5), and which ones have not yet run and completed testing and diagnosis of their designated sections of the vehicle’s emissions system.
The I/M Readiness Monitor Status function also can be used (after repair of a fault has been performed) to confirm that the repair has been performed correctly, and/or to check for Monitor Run Status.
4. Data Stream
This option retrieves and displays live data and parameters from the vehicle’s ECU.
5. View Freeze Frame
When an emission-related fault occurs, certain vehicle conditions are recorded by the on-board computer. This OBD2 Code Reader Scanner is referred to as freeze frame data. Freeze Data is a snapshot of the operating conditions at the time of an emission-related fault.
Note: If DTCs were erased, Freeze Data may not be stored in vehicle memory depending on vehicle.
6. O2 sensor test
The results of O2 sensor test are not live values but instead the results of the ECU’s last O2 sensor test. For live O2 sensor readings, refer to any of the live sensor screens such as Graph Screen.
Not all test values are applicable to all vehicles. Therefore, the list generated will vary depending on vehicle. In addition, not all vehicles support the Oxygen Sensors screen.
7. On-board monitor test
This function can be utilized to read the results of on-board diagnostic monitoring tests for specific components/systems.
8. EVAP System Test
The EVAP test function lets you initiate a leak test for the vehicle’s EVAP system. The LAUNCH CRP129 Premium Scanner does not perform the leak test, but signals to vehicle’s on-board computer to initiate the test. Before using the system test function, refer to the vehicle’s service repair manual to determine the procedures necessary to stop the test.
9. Vehicle Info
This option displays the vehicle information, such as VIN (Vehicle identification Number), CID (Calibration ID) and CVN (Calibration Verification Number).
5.2 System Diagnosing
This function is specially designed to diagnose electronic control system of single vehicle model which includes the following systems:
● ENG (Engine)
● ABS (Anti-lock Brake System)
● TCM (Transmission Control Module)
● SRS (Supplemental Restraint System)
Notes:
● Before diagnosing, please make sure the diagnostic program corresponding to certain vehicle model has been installed on your CRP12X Premium.
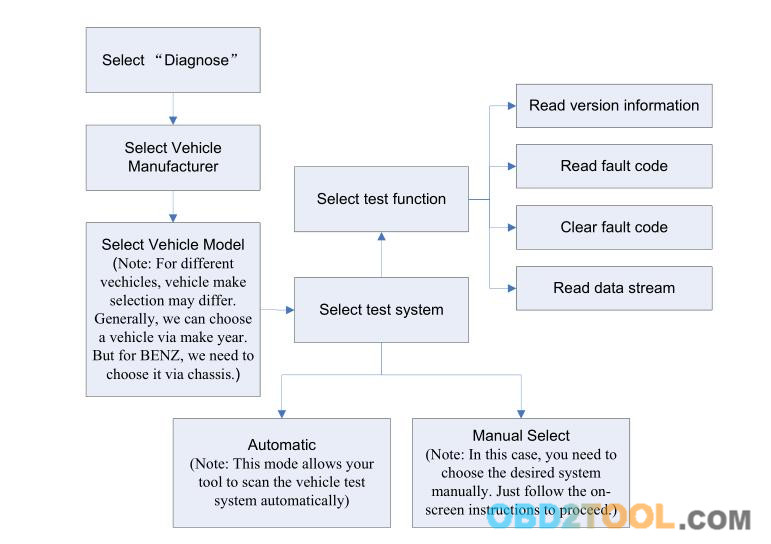
● For vehicles manufactured by different vendors, it is possible that it has different diagnostic menus. Refer to the flowchart illustrated as below to diagnose a vehicle:
5.3 Resetting (Only applies to CRP129 Premium)
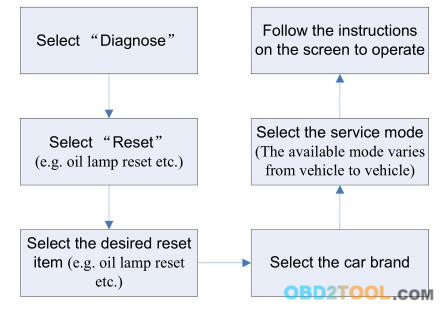
In addition to amazing & powerful diagnostic function, Code Reader Scanner CRP129P also features Oil / Service lamp reset. There are two methods to reset service lamp: Manual reset or Auto reset. Auto reset follows the principle of sending command from CRP129 Premium to vehicle’s ECU to do resetting. While using manual reset, users just follow the on-screen instructions to select appropriate execution options, enter correct data or values, and perform necessary actions, the system will guide you through the complete performance for various service operations.
Follow the flowchart shown as below to perform resetting.
5.4 Review
This function is used to review or delete the recorded DTC, Data Streams and Freeze Frame.


